
原文链接放在我的 GitHub 上: https://github.com/upupming/frontend-learning-map/blob/main/daily-fe-problems/create-vue-learning.md ,这也是我的前端学习路线,欢迎大家 Star~
美国时间 2021 年 10 月 7 日早晨,This Dot Media 邀请了 Vue 的核心成员和 Vue Community (例如 Quasar, Ionic 开发者等)的一些主要贡献者举办了一个 Vue Contributor Days 在线会议,长达两个半小时,会上 vue-cli 的核心贡献者胖茶也在同一天公开了全新的脚手架工具 create-vue,我也是看到 antfu 发推就关注了一下,看完直播回放之后收货很大,这里做一些总结并且分析一下最新发布的 create-vue 的源码。
主要关注了尤大的 talk,PPT 链接在这里,我转载到了我的 GitHub 上,大家可以下载来看一下最新的进展,另外还有胖茶现场演示了如何使用 create-vue。
主要内容
Vue 3.2 在 2021.08.09 就已经发布了,最重要的就是 <script setup> 不再是实验阶段了,可以稳定使用。之前用过 composition API 的朋友都会觉得比较麻烦,<script setup> 主要是为了作为语法糖简化其写法,可以参考文档和 RFC。Vue 3.2 新增了一些新功能,如 defineCustomElement 和 v-memo 等等。
尤大还提到了新的 Ref Transform 提案,虽然现在 TS 环境下多一个 .value 没有什么太大的问题,类型提示能够自动补全做的很好,但是 Ref Transform 提案可以进一步简化省去 .value 这一步,而且 TS 支持也做好了:
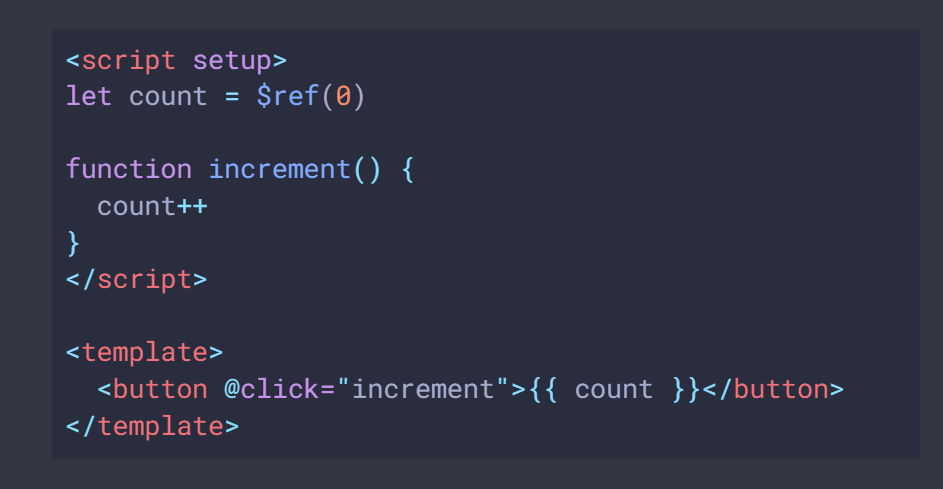
使用 cout = $ref(0) 定义之后,使用 count 的时候会被编译成 count.value,同时还有一个反向操作 $$,重新把 reactive value 变成 ref。感觉这个简化确实很有前途,可能会被广泛使用。
另外 Vue 团队正在积极准备 3.3 版本,主要集中尽力在优化 SSR 相关的功能。可以期待一下。
尤大给出了最新的官方推荐:
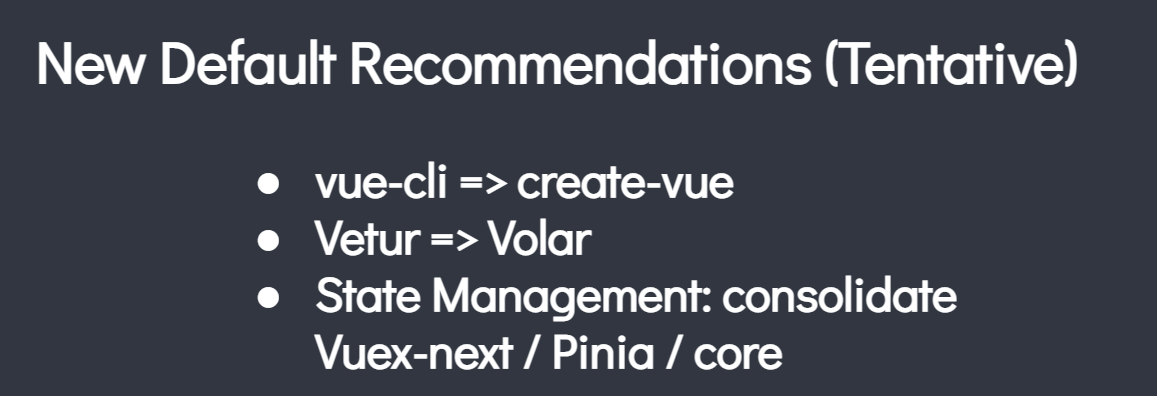
- 推荐使用 create-vue 替换 vue cli,注意如果你的项目如果使用 vue cli 创建的,能够稳定使用的话,暂时没有提供转换成 create-vue 项目的方案,而且也不建议修改大型项目的基础配置。以后的新项目大家可以使用 create-vue 来创建更加快的应用,因为 create-vue 的模板项目都是基于 vite 来进行构建的了。
- 推荐使用 VSCode 的 Volar 插件而不是 Vetur 来获取更好的 TypeScript 支持(script setup 支持地很好,
vue-tsc表现和 volar 一致,因为都是用的一个 language service (@johnsoncodehk 开发的vscode-vue-languageservice)),卸载 Vetur 安装 Volar 即可。 - 状态管理的话,正在考虑在 vuex next / Pinia (也是新出来的一个状态管理工具) / vue core 三者中考虑一个新的主推
另外 Vue 3 的官方文档正在快速更新,新版的文档可以在 https://github.com/vuejs/docs/tree/next 看到源码,部署在 https://vue-docs-preview.netlify.app/ 。里面新增了许多 example,可以看 Options API 和 Composition API 两种格式,Composition API 已经都是用 script setup 来写的了,另外也有 HTML 和 SFC 两种不同的版本,感觉用 example 学起来方便很多。同时也提供了 tutorial 和 guide 两种学习方案,非常体贴。
胖茶介绍了 create-vue 的使用,令人兴奋的是,所有的模板现在的构建工具全部都是基于 vite 而不是 vue cli (Webpack) 的了,开发效率大大提升,同时使用 cypress 来作为自动测试的工具。之前 Vue 2 单元测试用的是 Jest,但是 Jest 对 Vue 3 的编译支持的不是很好,所以选择了 cypress 同时做单元测试和 E2E 测试。整个 create-vue 包的依赖数量非常少,很多没有必要的依赖都没放,而且胖茶自己做了一个预先打包导致下载速度变快了许多。同时创建的模板项目也足够轻量。
后面 antfu 还介绍了最近他开发的 unplugin,支持一个插件写完,Rollup、Vite、Webpack 4、Webpack 5 都能使用,这个还没有详细使用过,下次有机会细看。
create-vue 源码解析
首先看目录结构:
index.js是整个 CLI 的打包入口,所有逻辑都是从这里开始的utils包含了用到的一些工具函数templateVue 项目模板,例如默认的 default 模板、带 router 的模板、带 ts 支持的模板等等。playground利用 create-vue 生成的项目的快照结果,在运行pnpm test时会用到,测试生成的模板项目代码的正确性
非常简洁明了,好在项目处于刚开始的阶段,index.js 只有 300 多行,可以很容易了解其中的细节。
整体流程
- 使用
prompt询问用户一系列 Yes/No 的问题,看用户需要哪些 feature,包括 TS, JSX, router, vuex, cypress。同时也会询问包名和是否覆盖已经存在的文件夹(如果之前已经创建过内容的话)。 - 验证包名是否合法,将不合法包名转换成合法的。
- 写入带包名和版本号的 package.json
- 调用
render函数,首先使用render('base')创建一个基础的模板,接下来按照用户需要哪些 feature,往已经创建的项目中添加对应的模板,例如render('config/jsx')就是对基础模板添加了 JSX 支持。 - 如果需要 TS 支持的话,后面有个特殊操作把所有 JS 重命名为 TS。将
jsconfig.json重命名为tsconfig.json。 - 默认是所有模板都包含测试的,如果用户不需要,最后需要删除一下
- 判断当前使用的包管理器是
npm/yarn/pnpm,方便后续输出xxx install提示 - 生成 README.md
- 最后输出提示,提示用户生成成功并展示绿色(
kolorist这个包用来处理颜色)的提示消息,提示后续操作cd xxx,xxx install,xxx dev
可以先运行一遍 npm init vue@next 感受一下具体的效果。
具体分析
可以看到,这里面最重要的还是 render 函数的实现,可以把一个相对目录下的文件给复制到最终生成的项目里面,同时还需要考虑文件相同的时候需要如何进行合并操作。这里主要看一下 render 函数的实现和一些我们以后可能用到的工具函数。
支持 feature flag
支持类似 npm init vue@next --vuex --ts 这种命令行参数,省去 prompt 提问环节直接开始生成项目。
// index.js |
render 函数
// index.js |
template/base 是一个最简单的所有结果都需要模板,它包括了 .vscode、index.html、vite.config.js 等这些基础性的东西。注意 vite 的理念和 Webpack 不一样,Webpack 和 esbuild 这些都是以 JS 为入口,但是 vite 是以 index.html 为入口的,使用的时候需要转换一下思维。这个模板的目录结构如下:
. |
注意里面有个 _gitignore 文件,使用 _ 开头是个惯例,因为以 . 开头的都是配置文件,会影响一些 CLI 工具和编辑器的行为,所以为了避免影响而使用 _,真正 render 的过程中需要重命名成 . 开头
我们主要看 renderTemplate 这个函数,位于 util/renderTemplate.js 中。
函数签名注释可以看,就是一个复制过程,但是又不完全是直接的复制,需要有一些特殊操作要考虑:
// utils/renderTemplate.js |
如果发现传入的是 src 文件夹的话,递归调用 renderTemplate 处理文件夹下的每一个文件或者文件夹:
// utils/renderTemplate.js |
递归调用写好,下面就只需要考虑 src 是文件的情况了。
如果是 package.json 文件,并且目标路径已经存在,需要先 merge 两个 JSON 对象,然后将 dependencies, devDependencies, peerDependencies, optionalDependencies 这 4 个字段按照字母序从上到下排列好。
if (filename === 'package.json' && fs.existsSync(dest)) { |
如果文件以 _ 开头,需要重命名成以 . 开头:
if (filename.startsWith('_')) { |
deepMerge 和 sortDependencies
这里有两个比较有用的函数,deepMerge 用来 merge 两个 object,相信这个也是面试的时候常考的一个题目,具体的思路就是如果都是对象的话就继续递归,递归到原始类型的时候就可以直接赋值来实现赋值了,而数组的话直接用解构赋值来一个浅拷贝就行了。
const isObject = (val) => val && typeof val === 'object' |
sortDependencies 是将对象按照 key 进行排序,ES6 标准要求 object 对字符串类型的 key 按照插入序排列,对整数类型的 key 按照升序排列,因为依赖项都是 npm 包名,必然以字母开头,可以按照插入序保证其迭代的时候的顺序,从而使得解构赋值能够拿到正确的顺序。
export default function sortDependencies(packageJson) { |
清除旧项目 rm -rf
之前经常遇到一个问题是 fs.rmdirSync 这个函数只能删除空文件夹,非空文件夹会报错,搜索 Stack Overflow 给的最高票答案是用 rimraf,但是这里为了少引入包可以直接实现了递归删除文件的功能。用的是多叉树深搜中的后序遍历,因为需要先删除子文件和子文件夹,才能保证当前文件夹为空。实现如下:
// utils/directoryTraverse.js |
这个工具函数也非常有用,又省去了一个 npm install。
测试
写完代码需要进行测试保证正确性。package.json 中的测试脚本如下所示:
"build": "esbuild --bundle index.js --format=cjs --platform=node --outfile=outfile.cjs", |
可以看到,首先是 pretest 运行 npm run build 进行打包,然后运行 npm run snapshot 生成 snapshot,生成快照过程就是各个 feature flag 排列组合一下,调用 create-vue 生成所有的可能的 feature flag 组合的模板结果,结果存放在 playground 文件夹下。排列组合可以使用二进制枚举实现。代码如下:
const featureFlags = ['typescript', 'jsx', 'router', 'vuex', 'with-tests'] |
之后再运行 test.js,就是对 playground 里面所有的项目依次运行 test:unit:ci(组件单元测试) 和 test:e2e:ci(E2E测试)了:
const playgroundDir = path.resolve(__dirname, './playground/') |
总结
- 看尤大的 talk 每次都有比较大的收获,有很多细小的问题都会解释的比较清晰,同时对 Vue 的未来规划能了解一些。
- create-vue 代码简洁,依赖少,启动快,同时这次全面拥抱 vite 也将是非常好的,抛弃掉 Webpack 之后轻松了许多,开发体验提升了不少。create-vue 中有不少工具函数可以先记下来,下次需要用到的时候就不愁没处 copy 啦~
- 不过 create-vue 现在还没有给模板添加 eslint 配置,后续可能会加上